
ExpenseBot Guide & FAQ
Quick Start Guide
Watch the 2-Minute Overview
This short video shows you everything you need to get started with ExpenseBot — how to capture receipts (email, photos, PDFs, Gmail), create a report, and share it with your accountant or finance team so they can import it into their accounting system.
Watch the Quick Start video:
Configuration & Setup
How do I configure ExpenseBot settings?
The Agent Configuration page lets you customize how ExpenseBot works for you — set up email preferences, configure automation settings, and personalize your expense tracking workflow.
Configuration options include:
- Gmail scanning: Enable automatic receipt capture from your inbox
- Email notifications: Choose when to receive processing updates
- Default currency: Set your home currency for multi-currency conversion
- Expense categories: Customize categories to match your business
- Auto-sharing: Set up automatic report sharing with your accountant
Take a few minutes to configure ExpenseBot when you first sign up, and the AI will handle expense tracking exactly the way you need it. Most settings can be changed anytime as your needs evolve.
How do I add custom G/L codes for my accountant?
Some companies require expenses to be submitted with specific accounting codes (G/L codes). Add your G/L codes to ExpenseBot and it will automatically categorize your expenses into the right accounts — so they're in perfect shape when you submit them to your accounting team.
Requirements
Do I need a Gmail account to use ExpenseBot?
You need a Google account to sign in. This can be a Gmail address, a Google Workspace account, or any email linked to Google.
Google Workspace users: Just sign in — you're already set.
Don't have a Google account? Create one with your existing email at the Google Account Sign‑up page — choose "Use your existing email."
Do I need an app?
No — just sign in at https://www.expensebot.ai
Solutions By Role
For Freelancers
- Super simple — just login, snap a photo, done
- No app to download — works in any browser with your Google account
- All receipts automatically appear in your Google Sheets
- Reports created in familiar spreadsheet format
- Import from PDFs, screenshots, or let our Gmail agent auto‑capture receipts
- One‑click sharing with your accountant — complete with all documentation
- AI organizes and categorizes expenses automatically
- Handles both expenses and invoices seamlessly
See how freelancers use ExpenseBot:
For Google Workspace Companies
Once invited, each member of your team can use ExpenseBot to capture and submit expenses under their own company domain. No separate accounts needed — your team simply logs in with their existing Google Workspace credentials.
See the complete workflow from purchase to approval:
Benefits for your organization:
- Team logs in with company domain — no separate accounts
- Create expense reports in your corporate Google Sheets
- Secure storage in your corporate Google Drive
- Gmail AI agent automatically captures receipt emails
- One‑click report sharing with finance team
- Built‑in Google Sheets collaboration features
- AI validates expenses against your corporate policy
- Simple license management and team assignments
- Organization‑wide analytics (Coming Soon)
- Virtual cards for budget control (Coming Soon)
For Accountants
- Eliminate client expense headaches
- Review and approve reports directly in browser
- Reports delivered in familiar spreadsheet format
- Export to ANY accounting software with AI G/L mapping
- Automatic invoice and expense separation
- Built‑in policy compliance validation
- Approved reports lock automatically to prevent tampering
See how accountants streamline expense management:
For CFO Consultants
- Save clients time and money across all departments
- Seamless ERP system integration
- Complete expense workflow with automatic report locking
- Works with all accounting packages, direct QuickBooks integration
- Delivers reports in familiar Google Sheets format
For Investment Managers
- AI‑powered expense compliance that reads your Form ADV
- Automatic fund vs. adviser allocation with SEC‑defensible citations
- Bulk invoice processing — handle hundreds of PDFs at once
- Auto‑retrieval of Form ADV directly from SEC database
- Vendor contract matching with renewal alerts
- One‑click push to QuickBooks or export to any accounting system
- Complete audit trail for SEC examinations
See how investment managers automate expense compliance:
For Real Estate Agents
- Simple mileage tracking for showings and appointments
- Gmail auto‑capture of MLS fees, staging invoices, photography bills
- Year‑end tax report with all deductions calculated
- Automatic business vs. personal expense separation
- Credit card reconciliation to catch missing receipts
- IRS‑compliant mileage log and expense documentation
- Import trips directly from Google Calendar
See how real estate agents track expenses and mileage:
For Executive Assistants
- Manage expense tracking for multiple executives from one account
- Set up executives with their own Gmail scanning and receipt forwarding
- Create and submit expense reports on behalf of executives
- Executives can sign in to review and approve their own reports
- Seamless handoff — you capture, they approve
How do I set up my executives in ExpenseBot?
As an executive assistant, you can add and manage multiple executives from your ExpenseBot account. Set up their email addresses, configure Gmail scanning, and start capturing their expenses immediately.
How do executives sign in after being invited?
Once you invite an executive, they receive an email with instructions to sign in. Executives can then view their expenses, review reports you've prepared, and approve them — all without needing to capture receipts themselves.
Automated Receipt & Invoice Capture
Email Import
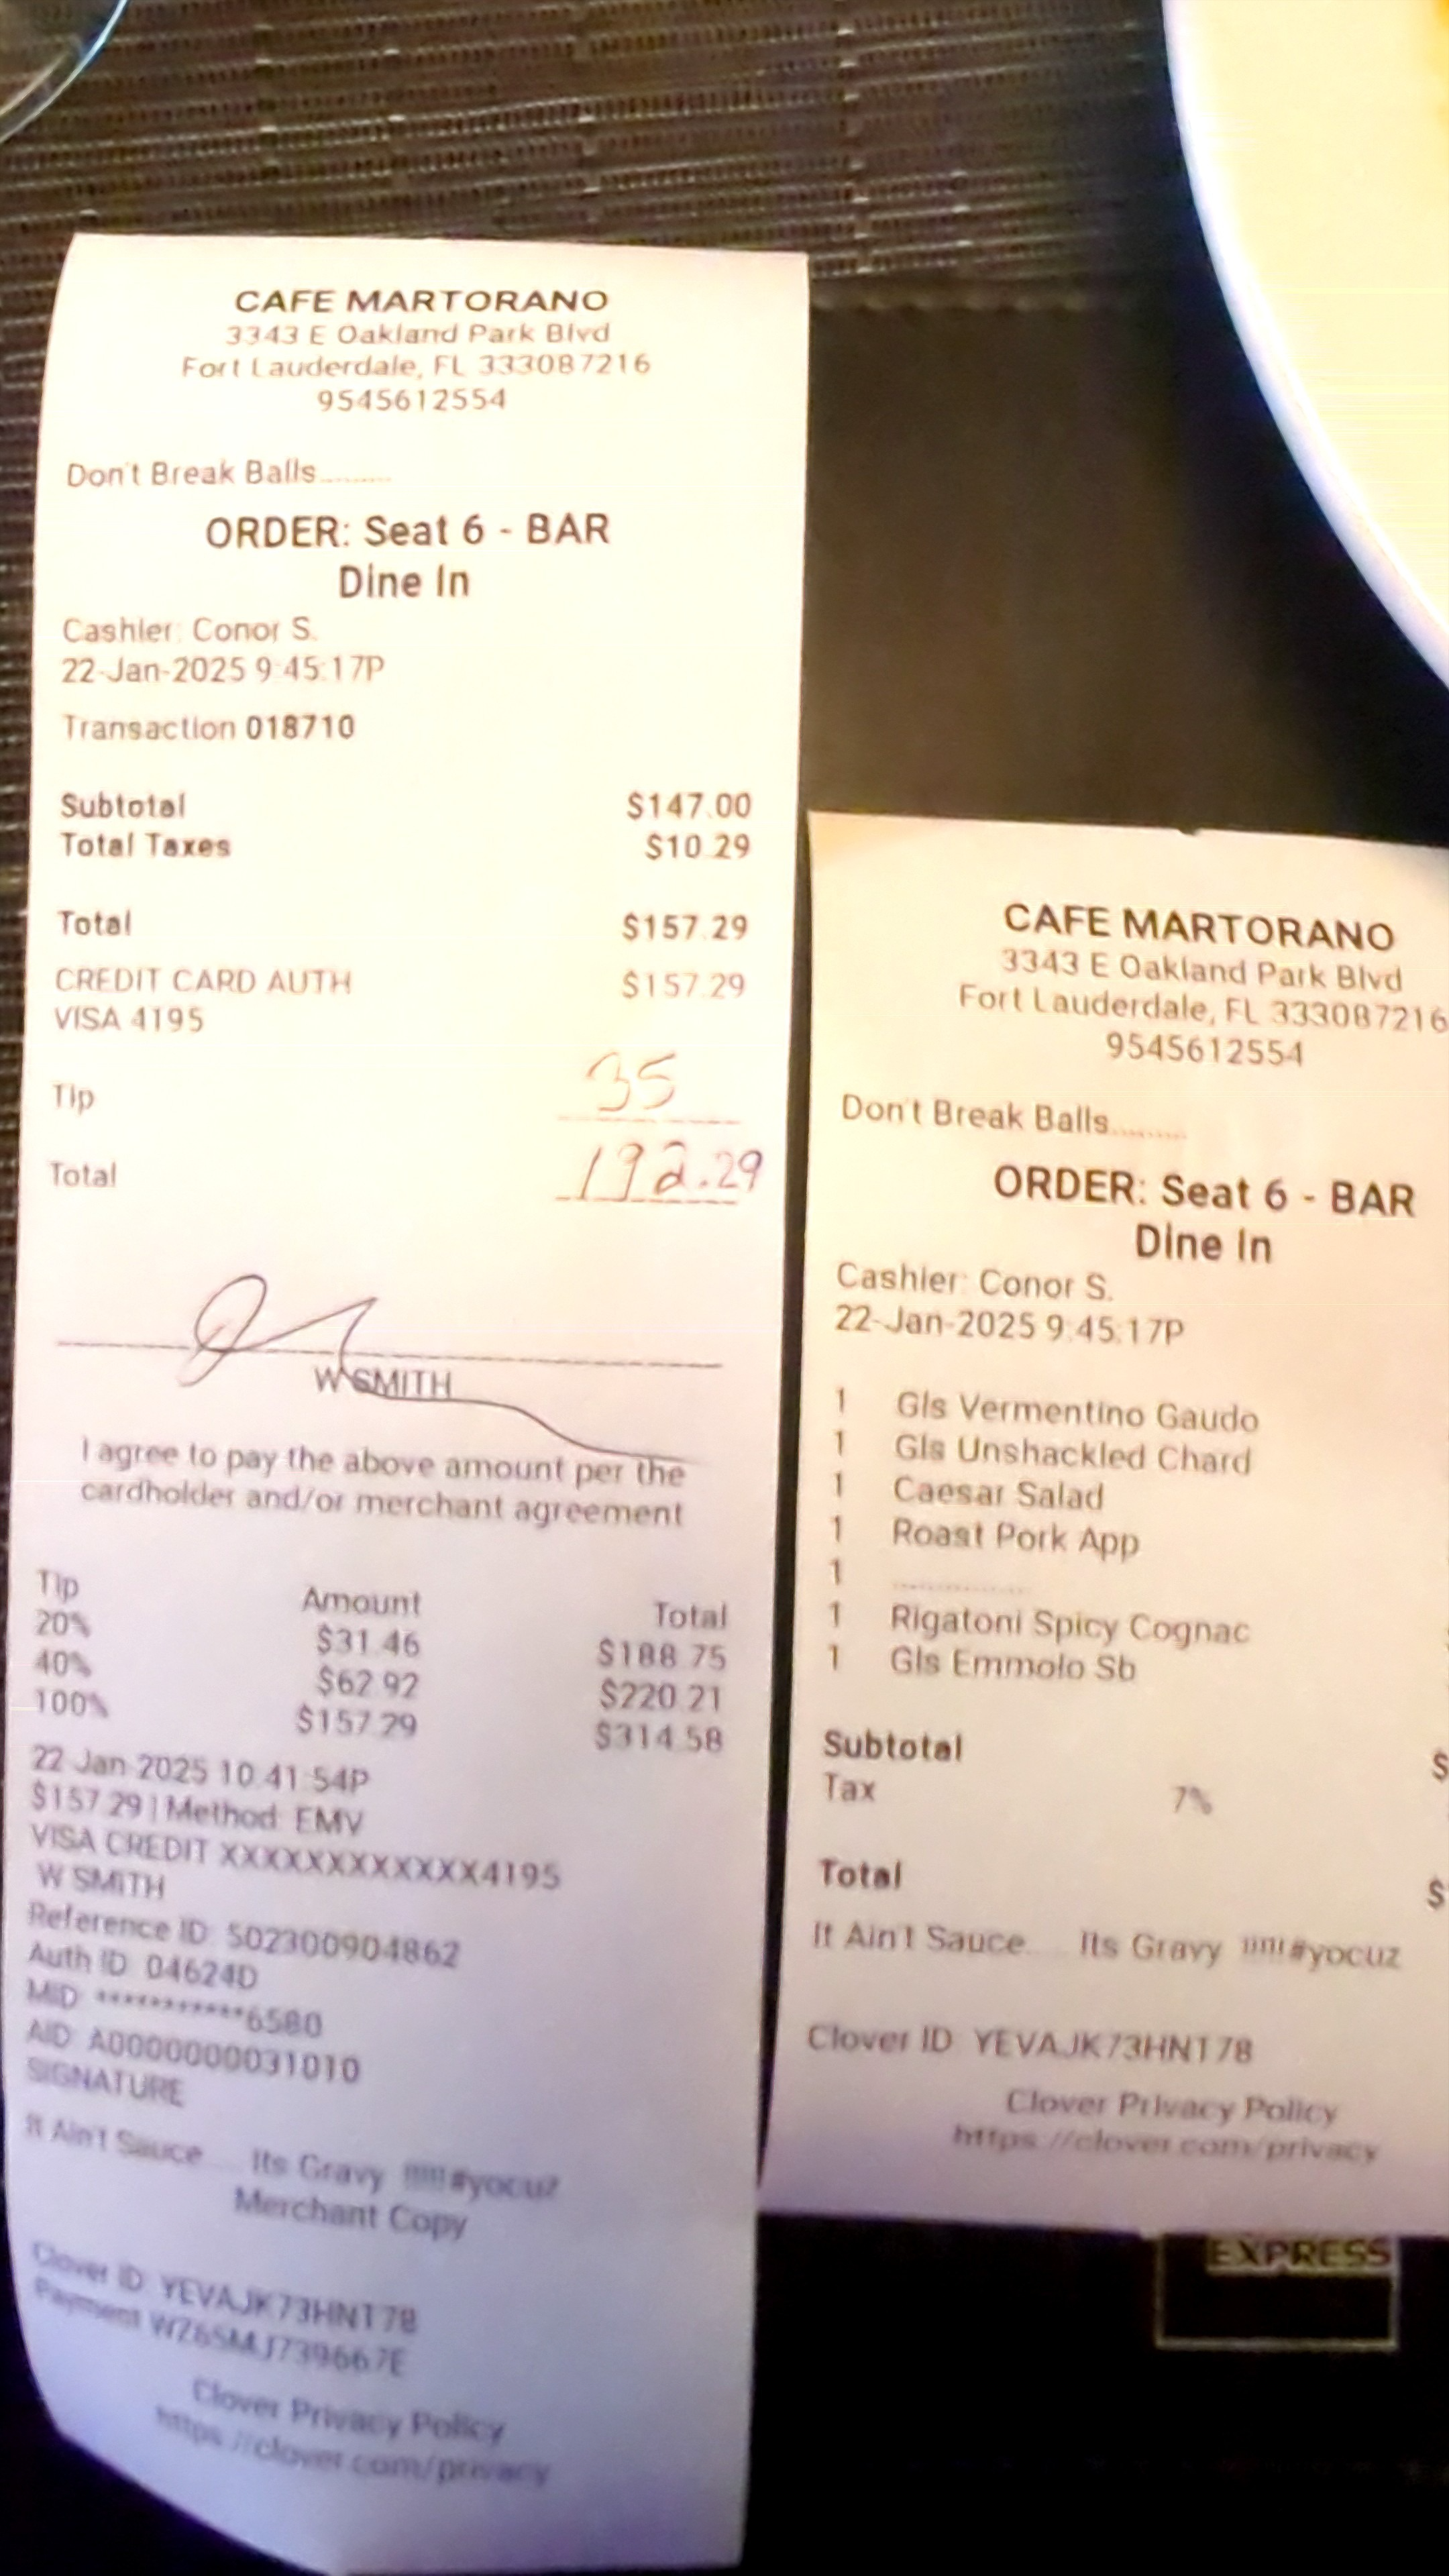
How do I submit receipts I receive by email?
You can easily forward any receipt emails to ExpenseBot. Simply forward your email to receipts@expensebot.ai and ExpenseBot will automatically process:
- PDF attachments containing receipts
- Receipt details embedded directly in the email body
- Image attachments of receipts
All forwarded receipts will automatically appear in your ExpenseBot spreadsheet:
How do I add expenses without a receipt?
For cash expenses or when you don't have a receipt, send an email to receipts@expensebot.ai with cash: prefix in the subject line. Include the amount, vendor, and description in the email body.
Common use cases for receiptless expenses:
- Cash payments at parking meters, tips, or small vendors
- Lost or faded receipts you need to reconstruct
- Toll booth charges and transit fares
- Vendor receipts you forgot to photograph
ExpenseBot will create an expense entry with the details you provide. The AI categorizes it automatically and adds it to your expense spreadsheet just like any other receipt. This ensures you never miss a tax deduction even when physical documentation isn't available.
Can I forward receipts from another email address?
Yes. Add it as an Email Alias in Settings. If most receipts arrive at the Gmail you signed up with, you can skip this.
How can I import receipts from my Gmail inbox?
Connect Gmail and let the AI find receipts automatically — no forwarding rules required:
Photo Import
How do I take a photo of a receipt and submit to ExpenseBot?
How can I import photos of receipts from Google Photos?
ExpenseBot makes it easy to find and import receipts directly from Google Photos:
How do I import screenshots and images from my device?
If you have screenshots, saved images, or other receipt photos stored directly on your device (not in Google Photos), you can import multiple images at once:
Document Import
How do I import multiple PDFs from my device?
Does ExpenseBot handle duplicate receipts?
Yes! ExpenseBot automatically detects and eliminates duplicate receipts to keep your reports accurate.
Does ExpenseBot handle multi currency?
Yes, we handle currency from any country and convert it back to your home currency using the exchange rate from the date of the receipt itself.
Mileage Tracking
How do I track business mileage?
ExpenseBot integrates with Google Maps to auto‑calculate distances. Enter your starting address and destination, toggle round‑trip if needed, and add it to your expense report with one click. The current IRS mileage rate is applied automatically to calculate your tax deduction.
Mileage tracking features:
- Google Maps integration: Auto-complete addresses and accurate distance calculation
- Round-trip toggle: One click to double mileage for return journeys
- Trip duplication: Reuse frequent routes with one click
- IRS-compliant log: Date, destination, purpose, and miles — everything the IRS requires
- Automatic rate updates: Always uses the current IRS standard mileage rate
The average business driver logs 10,000+ miles per year. At the current IRS rate, that's over $6,700 in tax deductions. ExpenseBot makes sure you capture every mile without a separate mileage tracking app draining your battery.
Can I import trips from Google Calendar?
Yes! If your calendar events have addresses (like client meetings, property showings, or job sites), ExpenseBot can import them and calculate mileage automatically. This is the easiest way to capture business miles you might otherwise forget.
Perfect for professionals with location-based appointments:
- Real estate agents: Import showings, open houses, and client meetings
- Field service technicians: Import job site visits and service calls
- Sales representatives: Import client visits and prospect meetings
- Consultants: Import on-site client engagements
- Healthcare workers: Import home visits and facility rounds
Simply connect your Google Calendar, select the events with addresses, and ExpenseBot calculates the mileage for each trip. No more forgetting to log miles after a busy day of appointments.
Report Creation & Submission
Creating Reports
How do I create a tailored expense report for a trip, project or client?
Use tags to group expenses, then create specialized reports using the Report Wizard:
Reconciling Your Expenses
How do I reconcile my credit card statement with my expenses?
Connect your bank or credit card via Plaid to automatically pull transactions for reconciliation. ExpenseBot matches your statement with expenses, finds missing receipts, and updates exchange rates.
Why connect your bank account:
- Automatic reconciliation: Match receipts against bank transactions instantly
- Find missing expenses: Catch deductible purchases you forgot to capture
- Home office deductions: Track utilities, internet, and rent payments automatically
- Month-by-month verification: Ensure every business expense is accounted for
- Year-end confidence: Know you haven't missed any tax deductions
Bank connections are secured through Plaid, the same technology used by major financial apps. ExpenseBot never sees your login credentials. You can also upload PDF statements manually if you prefer not to connect directly.
Sharing Reports
How do I share my expense report with a manager or accountant?
Share your report quickly with our One‑Click Sharing feature:
Review & Approval
How do I approve expense reports as a manager or accountant?
When you receive access to a report, here's what you can do:
How do approved reports get locked to prevent tampering?
Once a report is approved in ExpenseBot, it becomes read‑only and locked in your Google Drive. This ensures compliance and preserves a secure audit trail for your finance team.
Expense Management & Organization
How do I manage tags to organize my expenses?
Tags let you group expenses by business trip, client, or project so you can create separate reports:
How do I customize expense categories?
ExpenseBot automatically determines the correct expense category account. Here's how you can customize them:
How do I add my Employee ID to my report?
Go to your main ExpenseBot spreadsheet, click the Settings tab, and enter your Employee ID in cell B2. Now all reports will include your Employee ID.
How do I delete a report?
Use the Report Wizard to delete or undo a report:
For Finance Teams
Invite Clients
How do I invite clients to use ExpenseBot and share reports with me?
Invite clients and enable automatic report sharing to streamline collaboration:
Communication & Collaboration
As a reviewer, how do I communicate with the submitter about expenses?
Leave comments on individual expenses or add notes about the entire report:
Compliance & Controls
How does the ExpenseBot AI determine compliance with Expense Policies?
Upload your policy PDF and ExpenseBot evaluates any report against it instantly.
Export & Integration
What accounting software does ExpenseBot support?
ExpenseBot integrates with a wide range of accounting software:
- QuickBooks Online: Direct one‑click sync for both expenses and invoices
- Xero: Export formatted for easy import
- Sage 50 Canada: Export ready‑to‑import files
- Sage 50 USA: Export ready‑to‑import files
- Sage Intacct: Export with automatic dimension mapping
- FreshBooks: Export with automatic G/L mapping
- Zoho Books: Export with custom field mapping
- NetSuite: Export formatted for NetSuite import
- Microsoft Dynamics Business Central: Export with G/L account mapping
Our AI export maps expenses to the correct G/L accounts for any accounting system, saving hours of manual categorization.
How does QuickBooks integration work?
ExpenseBot features a direct API integration with QuickBooks Online — not just an export. Connect once through our guided wizard, and expenses sync automatically with one click. Featured in the QuickBooks App Store.
QuickBooks integration features:
- One-click sync: Submit your expense report and it creates a bill in QuickBooks instantly
- AI vendor matching: Automatically matches expenses to existing QuickBooks vendors
- Smart GL mapping: AI maps expense categories to your QuickBooks chart of accounts
- Invoice handling: Vendor invoices become individual bills; receipts consolidate into one bill
- Billable expenses: Track client-billable expenses for easy reimbursement
- Receipt attachments: Original receipts attach directly to QuickBooks bills
Unlike export-based integrations, the QuickBooks API sync means no manual file uploads or imports — just click "Submit to QuickBooks" and the bill appears in your accounting system, ready for payment.
Team Administration
What can I do as a Team Administrator?
Admins can manage licenses, sync G/L accounts, and standardize tags across the team:
Administrator Capabilities:
- Assign Licenses: Allocate licenses to team members
- Sync G/L Accounts: Keep consistent accounts across your organization
- Manage Tags: Create and sync project/client/department tags
- Team spending insights: Ask the chat assistant questions like “Summarize my team spending this year”
These features ensure consistency while saving time through AI automation.
How do I sync expense categories and G/L accounts for my team?
Upload your company's expense categories and G/L accounts to ensure consistent coding across all team members:
How do I purchase ExpenseBot licenses for my team?
Purchase multiple licenses at once and assign them to team members:
Tax & Year‑End Reports
How do I get my year‑end tax summary?
ExpenseBot automatically generates a complete year‑end tax report with all expenses categorized, deductions calculated, and receipts attached. On December 31st, you receive a comprehensive spreadsheet ready to hand to your accountant or upload to tax software.
What's included in your year‑end tax report:
- Expense summary by category: Travel, meals, office supplies, subscriptions, and more
- Mileage log: Complete IRS-compliant record of all business miles
- Deduction calculations: Business use percentages already applied
- Receipt documentation: All receipts attached and organized
- Tax form pre-fill: Schedule C (US) or T2125 (Canada) for freelancers
For US freelancers, ExpenseBot can pre-fill your Schedule C with expense totals by category. Canadian freelancers get the T2125 Statement of Business Activities. This saves hours of manual data entry and reduces errors during tax filing season.
How do I set business use percentage for categories?
Many expenses are only partially deductible when used for both business and personal purposes. ExpenseBot lets you configure the business use percentage for each expense category, and automatically calculates the deductible portion.
Common partial deduction examples:
- Internet: 50% if you work from home half the time
- Cell phone: 70% if mostly used for business calls
- Home office: Based on square footage percentage
- Vehicle: Based on business vs. personal miles driven
- Meals: 50% deductible for business meals (IRS rule)
Set these percentages once in your expense category settings, and ExpenseBot applies them automatically to every expense in that category. Your year-end tax report shows both the full expense amount and the calculated business deduction.
AI Todo List
What is the AI Todo List?
Free for all ExpenseBot users! Email your notes, reminders, or meeting notes to todo@expensebot.ai and AI organizes everything into one continuously‑updated Google Doc. No app switching, no manual organizing — just email and done. Powered by Gemini 2.5.
What you can email to your AI todo list:
- Voice memos: Forward voice recordings and AI transcribes and organizes them
- Meeting notes: Send raw notes and AI extracts action items
- Quick reminders: "Remind me to call John about the contract"
- Project ideas: Brain dump ideas and AI categorizes them
- Shopping lists: Add items and they're organized by store/category
Unlike traditional todo apps, you never need to open an app or log in. Just email from anywhere — your phone, laptop, or even forward emails with tasks. The AI continuously updates your Google Doc, merging related items, removing duplicates, and keeping everything organized. It's like having a personal assistant who never sleeps.
Tips & Best Practices
Receipt Management
How do I write on receipts for easy tagging?
Write special prefixes on receipts before photographing. ExpenseBot's AI reads your handwriting and automatically processes them — no manual entry required after upload.
What to write on your receipts:
- TAG:ClientName — Creates a new tag or groups to an existing one. Examples: "TAG:Acme Corp", "TAG:NYC Conference", "TAG:Project-123"
- w/ Names — Adds attendee names to the notes field. Example: "w/ Colin & Rebecca" puts "Colin & Rebecca" in the expense notes — perfect for tracking who attended business dinners
This simple technique saves hours of manual categorization. Write "TAG:Acme" on all receipts for that client, and they're automatically grouped together for easy reporting. Write "w/ John Smith" on dinner receipts to document who you met with. Perfect for freelancers tracking multiple clients, consultants billing projects, or anyone who needs to document business meal attendees.
Quick Tips
- After submitting a photo of a receipt to ExpenseBot, you can delete it from your camera roll.
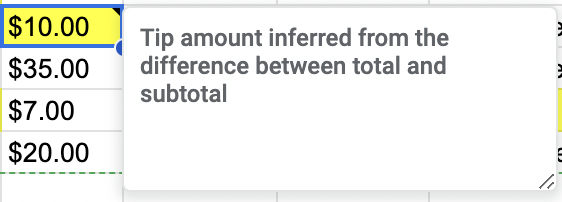
- For restaurant receipts, include the itemized receipt and the credit‑card slip in the same photo to capture tax, tip, and total.
Organization Best Practices
- Invite someone to approve or review your reports.
- Review yellow highlighted cells to check AI suggestions.
- All ExpenseBot data is stored in your Google Drive "ExpenseBot Expenses" folder.
Privacy & Security
How does ExpenseBot handle my data?
ExpenseBot uses a privacy‑first approach. Unlike most apps, ExpenseBot does not store your data. All data (photos and spreadsheets) is stored on your own Google Drive, accessible only by you.
Can I reset my account or delete my data?
Yes, under Settings, choose Reset Account to delete the ExpenseBot folder on your Drive and start fresh. This won't affect your subscription status.
Support
How to Get Help
Email Support
Our team is available Monday–Friday, 9 AM–6 PM EST.
Contact Support: support@expensebot.aiDocumentation
Browse our guides and tutorials in the sections above.
Response Times
We typically respond within 24 business hours.
For urgent matters, include "URGENT" in your email subject line.